Tuesday, May 31, 2016

Chair Repair Continued and Extras

Question: What's going  on?
Cruz: We're continuing the repair of the chair in the classroom. 

Question: Cool! How has the progress come?
Cruz: Well we have learned a different type of welding, and we have also improved on our mig welding skills. 

Question:What new things did you learn?
Cruz: We learned how to tig weld and how we can use that to repair the chair.


Question: That's awesome! So what has been resolved with the chair?
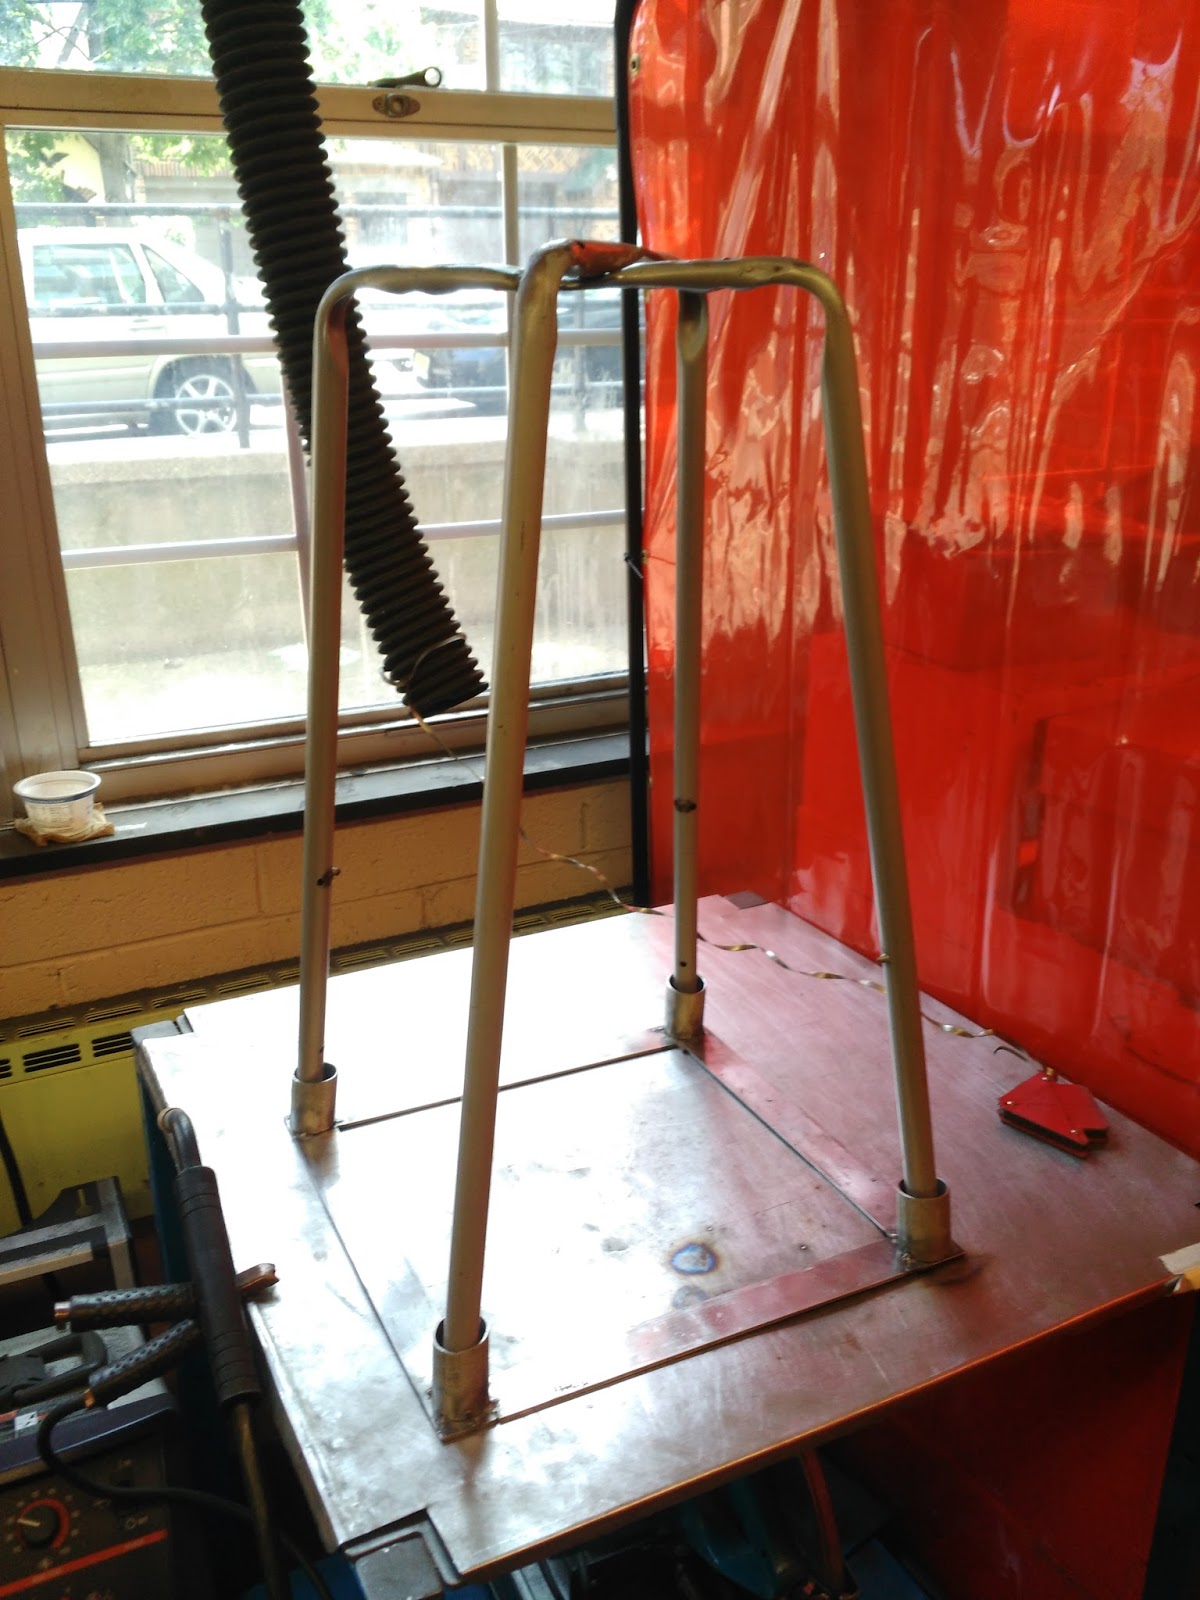
Cruz: Well now that our welding skills meet the requirements for the job, we begun on fixing the legs together.

Question:Okay, so how will that work out?

Cruz: For starters, we clamped the top part of the legs to keep them in place when we begin welding.

Question: Okay, but will that be enough to hold it together?
Cruz: Nope. That is why Mr. Grosinger let us use a mechanism that will keep the legs equal distance apart. It will also prevent the legs from shifting and moving out of place while welding.

Question: What is the square called?
Cruz: I forgot the name of it... But it was made by a student from Memorial High School who is also in Mr. G's class. It is really helpful.

Question: How have your skills improved?

Before

After
Cruz: It might not look like much, but we have been able to weld more thoroughly and have less gaps between solids and the welding.

Question: What's next?
Cruz: Actually weld the legs with the seat. Hopefully we finish the product before the year ends.

Question: Awesome! What have your pals been up to?
Cruz: they have also updated their blogs. You can check out their posts at
http://ramialhusseinengineering.blogspot.com/
http://kellycocaengineering.blogspot.com/

Thursday, February 18, 2016

Chop Saw

Question: What is going on with the chair?
Cruz: Now we weld. This post will link to my previous post and future post in the process of us repairing the metal stool.

Question: So what are you learning at the moment?
Cruz: Right now I'm learning how to use the chop saw.
Question: What's the chop saw for?
Cruz: The chop saw's used to cut out strips of metal or pieces of metal out of a larger body of metal. We're practicing inn using this machine before we begin cutting out pieces for our chair.

Question: How does the machine work?
Cruz: Well, from what our teacher, Mr. Grosinger, explained, the blade of the saw spins clockwise at very fast speeds to be able to go through the metal object without shattering or pushing back. However, it is also necessary for the user to put enough force on the handle of the blade for it to go through smoothly.

Question: What do you need to be aware of when using the machine?
Cruz: Safety is key! We clean up the work area and make sure it is free of debris that way nothing interferes with the blade and the metal. We wear goggles to avoid shreds of metal from going into our eyes (ouch!).

Question: Are the sparks produced during the process dangerous?
Cruz: The sparks aren't necessarily dangerous, but gloves should be worn to avoid having hot spots on your hands. Also, the sparks are hot enough to ignite a flammable substance and create a disaster.

Question: After the saw, what's the next step?
Picture by Cruz Flores

Cruz: After cutting our pieces of metal, we began welding!

Question: Why weld two pieces of metal?
Cruz: Before we go straight to the chair and try to fix it in one go, Mr. Grosinger wants us to build on our skills and wants to make sure we can weld without a problem.

Question: Can you explain how welding works?
Cruz: I would love to, but group member Rami is detailing that process.

I will update our progress in repairing the chair and discovering more metal-working skills. Until then, check out the blogs of the other group members:
Rami Alhussein: http://ramialhusseinengineering.blogspot.com/
Kelly Coca: http://kellycocaengineering.blogspot.com/?m=1


Friday, January 22, 2016

I Can Fix It!


Question: What's with the picture?
Cruz: That's a picture of my classmates cutting off a leg from a metal chair. 

Question: Why are you guys cutting pieces of a chair?
Cruz: We're repairing the chairs inside our Powers and Tools classroom. It's not really because our teacher is lazy, but because there is a lot to learn in the process in repairing a simple tool that we do not think a lot about.

Question: Cool. So what exactly are the repairs that are being done to the chair(s)?
Cruz: We are not only making the chairs look nicer, we are also repairing its legs to make them stronger and prevent them from wobbling side to side.

Question: What do you mean by the legs wobbling
Cruz:
Credit to metroretrofurniture.com
The chair has two pairs of conjoined legs. The legs are welded together in a cross-shape, allowing the legs to all be at the edge, like shown. However, the ring on the bottom supports weight, but it does not prevent the legs from being detached. The legs can become loose from the welding on the bottom of the seat or from the ring. Thus, the legs become wobbly, and the chair then becomes unstable.

Question: So how do you plan on repairing this?
Cruz: Great question! My partners, Kelly, Rami, and I have decided to do the following:
We decided to weld the legs with pieces of metal. This would hold the legs down to the stool, preventing the legs from becoming loose over time. It would also keep the legs sturdy in a straight direction, preventing the chair from swinging side to side. 

Question: So what else is going to happen?
Cruz: Remember the ring mentioned before? Well we are going to weld the ring outside of the legs. 

Question: Huh? What do you mean outside?
Cruz: I mean the ring will be holding the legs inside of it! The ring holding the legs inside of it will make the chair sturdier and will prevent from the bottom half of the legs to lose strength and will keep the chair, like mentioned before, swinging side to side.

Question: This looks like a fun project. Is the finished product ready to be shown?
Cruz: No, not yet. But it will be soon! I will keep my blog updated, aside from updating the process of the project.

Want to know more? Follow Kelly Coca's and Rami Alhussein's blog to see more of the project!

http://ramialhusseinengineering.blogspot.com/
http://kellycocaengineering.blogspot.com/
Displaying IMG_2608.JPG

Sunday, December 20, 2015

Metal Sculpture Project

Question: Another entry! What is this one about?
Cruz: Hello again! This entry will be about a cool metal sculpting project we did in Mr. Grosinger's class.
Inscribed is "Will you go to Prom with Me" Picture: Cruz Flores


Question: So what was the goal of the project? What did you do?
Cruz: The main goal was for us to use our metal working skills to create a holiday gift no bigger than our hands. I made two things; A small promposal (term used when asking someone out to prom) plaque, and a small snowflake. The snowflake was done for fun, since I didn't want to be in class with nothing to do.


Question: Cool. So what was your plan in making the metal plaque?
Cruz: So I made a drawing of how I wanted the plaque to look, and it was a simple template.
Created via Google Drawings
Afterwards I drew the template on paper and made a cutout pattern.

Question: After making a cutout, what happened next?
Cruz: I traced the cutout on a small sheet of aluminum, since it's easy to cut and shape

The shapes are somewhat visible, but I decided to only cut out the flower shape, and to only trace the heart, but to not cut it out. I wanted to make the heart part of the metal, so I just gave it volume for a lack of a better word.

Question: What did you do to the flower after cutting it out? What was the reason behind cutting it out?
Cruz:

 I cut out the flower to make the plaque look nicer and to give the flower more pop. If i had not cutout the flower and had left it like I had first left it when I started cutting, it wouldn't look like a flower at all. It would look like a shagged edge that was done on purpose. You can't ask out a girl by handing her a sharp piece of metal.

Digressing. After cutting out the flower, I attached it to the plaque with a rivet.

Question: You said that you didn't want to cutout the heart shape entirely, but wanted to give it depth instead. What did you mean by that?
Cruz: Well I didn't take a picture of the specific area, but this picture shows the heart kind of sinking in the plaque
It gives the plaque a nicer shape. I gave depth to the heart by using a chasing hammer. A chasing hammer is a hammer with a flat face on side and a curved ball face on the other. I used the ball side to make the heart as it is.

Question: After shaping the plaque and attaching the flower, what came next?
Cruz: Next came the paint. The plaque with the words carved into them without color would look dull, wouldn't you agree?
Like any other heart, I decided to color the one on the plaque red, and decided to color the flower blue for the petals and green for the stem. A standard color scheme.
Ta-da!
Question: After the paint, what did you do next?
Cruz: I should've done this before painting the plaque for a nicer touch, but I forgot. After the paint dried out, I went ahead and inscribed my message onto the plaque. I used these shaped metal stamps to engrave the letters. I would line up a single letter, and hammer the stamp to make sure the mark goes through

Question: What were the finishing touches?
Cruz: After engraving and painting, I just had to sand any edges that seemed sharp. I sanded along the way after every cutout, so it was a small checkup.

Question: So why a plaque to ask somebody out? And who is it?
Cruz: Some may see it as something silly, but it was fun making a plaque for a date. And it'll be a nice memory to look back at in the future. Girls like creativity.
As for who I'm going to ask, I'll keep that information private.

Thanks for reading, and another post will come as soon as possible!

Friday, November 13, 2015

How to Make a Penny Battery

Question: What is a penny battery?
This photo was taken by me...  Cruz Flores

Cruz: The name says it all! It's a battery made completely out of pennies. It may be hard to construct for only a small amount of power, but it is still cool and nifty to see what simple components make up a manufactured battery.

Question: What materials do you need?

Cruz: You would need:
-8 pennies (shaven on one side; 1985 and newer)
-LED light
-switch (optional)
-Cardboard
-Vinegar (Salt water mix and soy sauce can also be used)
-File (sandpaper works too)

Question: Why do the pennies have to be shaven off on one side?


Cruz: Well the battery has two main components: electrode and electrolyte. The copper acts as the positive side of the battery, and the zinc acts as the negative side of the battery. So if you did not scratch off one side of a penny to reveal the zinc, your battery would have no negative end and the electrolyte can pass through. The electrolyte in this case is your cardboard+ your acidic liquid.

Question: Okay, so how do I start making my battery?
Cruz: You can start off by cutting the cardboard into small squares slightly smaller than the penny.
Then get the pieces of cardboard soaked in vinegar. As the cardboard absorbs the vinegar, place one penny, shaven side up.
Place one of the wet cardboard pieces on top of the penny. This is one cell. Continue stacking the pennies in the same manner; copper, zinc, cardboard.

Question: What do I do next?
Cruz: Now it's time to see how much power it has! Grab your LED light and place the wires onto the battery. The wire that is slight longer is the positive side, so that will be touching the top of the battery. and the slightly shorter wire will touch the, if you decided to do so, aluminum foil. If not, then it will be touching the bottom of the battery.

Question: How do I show this on paper?

Cruz: Draw a schematic! A schematic is a diagram showing how the circuit runs.

Question: Can I keep the light on forever?
Cruz: Well, not forever. The battery will dry up, and power will stop running to the LED light, but you can seal the battery to slow down the evaporation process by using electrical tape to connect both the battery and the LED light.

Question: What else can I do with the battery?
Cruz: You can create a switch and wire together the battery and the LED light, that way you can turn the light on and off manually.

Question: Is the battery only useful for powering LED lights?
Cruz: Of course not! You can also power a small fan, so you can also make a hand held fan to use on the go!

Question: Was it fun to do this?
Cruz: Definitely! It was a small science lesson and a small life tip to use when there is no power. You can use your spare change to charge your phone! But that requires much more copper and zinc, so start saving up!